Category Archives: tools and materials

Canva Review

Announcement produced with Canva template

Last year I started following an instagram guru Kat Coroy (@katcoroy) and almost signed up for her Instagram Makeover course.  As I waited to have at least a month to dedicate to that online marketing exercise, I continued to receive many interesting tips.  One of her suggestions was Canva. 

Now, I get all kinds of solicitations for marketing tools, so I didn’t pay that much attention.  I finally downloaded the smartphone app and I have to say I’m impressed.  This app has a LOT of useful features.

Canva is hard to describe; their own page doesn’t even try.  I would say it’s primarily a marketing tool.  When you open the app,  you see a prompt to Create a Design and you can scroll through hundreds of beautiful templates to truly Design Anything as the lead in proclaims.

This tool is chock full of templates to match anything you might possibly want to create- Instagram posts, stories, facebook posts, headers, logos, business cards, newsletters, posters, you name it, it’s there.  When you choose one of the categories, you are offered a blank as well as pages of beautiful pre-designed templates that you can modify for your own use.  I used a Canva template for this blogs image, and you can see the AANV Give Art ad that I enhanced with Canva in my instagram feed here

Canva runs on all devices.  You can work through your desktop browser or smartphone app.  You can try Canva for free and unlike some “free apps”, there is a very useful subset of the full version.  I signed up for the free 30-day trial of the pro version.  If you do so, beware!  You may find you can’t live without it.  

Disclaimer:  If you use the link below to sign up for Canva, we will both get rewards.

If you ever need to create a graphic, poster, invitation, logo, presentation or anything that looks good – give Canva a go.

    •    It’s free!

    •    Easy to use – simply drag and drop

    •    60,000+ templates

Join Now

Beware the “Send Verification Code” Scam

This scam has been around for at least a year but we were unaware of it.

We recently became aware of this scam when we listed an item for sale on Craigslist.  We immediately received a response that was clearly automated.  You can tell this when the title of the email is something like, “I want to buy your ______” and the text then matches your item description exactly, no matter how awkward the wording.  

Our suspicions aroused, my husband responded anyway, reasoning that the supposed buyer had his phone number from our listing anyway.  He then began speaking to an actual person, but this buyer had an odd request.  He wanted to “send a code” like a verification code to my husband.  The buyer claimed that this was the only way he could tell if my husband was a legitimate seller. This was a very suspicious and odd request.  

It turns out this is a very dangerous scam that takes advantage of two-factor authentication.  Two-factor authentication is a method used by many businesses to verify your identity. As detailed in this article by Apple, two-factor authentication is an extra layer of security designed to ensure that you are the only person who can access your account, even if someone knows more information about you, like your password.  It involves you receiving a code on a device like your smartphone and then you must enter that code before you can get into your account. The point here is that you should NEVER give this code to anyone else. 

This scam allows the scammer to create an online account with your phone number.  The scammer starts to create the account which triggers the sending of an authentication code to your smartphone.  The scammer is only pretending to generate this code himself.  If you agree to receive the code and then repeat it back to the him, the scammer will have access to an account in any name he wants but associated with YOUR phone number.  This method can be used by the scammer to create any accounts using two-factor authentication, for example Google Voice or Craigslist. Any spam or illegal activity he does with that account will be associated with YOUR phone number.

Bottom line:  don’t give any verification code to anyone.

agnv-august20

My work currently on exhibit at Art Gallery Napa Valley

Photoshop Tip: Magnetic Lasso

If you enjoy this article, please consider supporting my art at FlyingPig Farm.  I am currently running a promotion where I select a piece to be 30% off each week.  Currently, it’s the White-crowned Sparrow.

Magnetic Lasso

I am currently studying Background and Shadows in an online course with Birgit O’Connor. While reading the section on preparing reference photos, I discovered I have a tool I didn’t know about.

Occasionally you might want to extract a subject from one of your photos to use it in a new composition.  It can be difficult to select only that object, especially if the edges are complex.  You’d like to separate a subject from its background, but you don’t want anything else in the image. This is often referred to in Photoshop as Making a Selection. 

I didn’t realize I had a Magnetic Lasso tool because it sits below the Lasso Tool by default.  The Lasso Tool allows you to draw a freehand selection around an object which can be difficult. 

The Magnetic Lasso Tool helps you detect the edges of an object by automatically clinging to them.  It works especially well where there is a lot of contrast between your subject and the background.  You can adjust the Edge Contrast and Frequency of anchor points to improve the selection.

My image shows a rose from my garden and a selection I did in less than a minute with the Magnetic Lasso.  It’s not perfect, but it’s a great starting point.  This was much easier to do than trying to drag the regular Lasso around all the edges myself.

This tool is also available in Photoshop Elements.  If you’d like to try it, I recommend searching for Magnetic Lasso online and following one of the many tutorials available.  You can also access the relevant Photoshop help files by clicking on the question mark in the tool bin. 

mageticLasso


Protect your Online Images with Pixsy

nectarine-4web

Nectarine Spring Blooms

Sadly, people seem to think that online images are for the taking.  They either don’t know or don’t care about image copyright laws.  Nor do they stop to think that the photographer or artist should be compensated for their work.  It is very difficult for an individual to protect their online images.

But that may be about to change.  In an April 9 blog post, the photo-sharing service Flickr announced a partnership with Pixsy.  Pixsy is an image monitoring service that can help you find and fight image theft.  

A member of Flickr recounted how he uses Pixsy.  In one case, he found one of his images on an album cover on iTunes!  Pixsy helped him detect copyright infringement and get fairly compensated for unauthorized use of his images

Flickr claims to be the best online photo management and sharing application in the world.  It has changed a bit since I first joined.  In order to survive financially, Flickr was purchased by Smug Mug.  It still has a free option, but the Pro option has many features that make it quite attractive.  One of the new features is Pixsy.

Pixsy provides a wide range of services from monitoring your images to sending legally binding takedown notices on a global level to have your image removed.  You can even submit a case to Pixsy’s legal department to recover lost revenue on your behalf.  And Pixsy doen’t get paid unless you do.

You may ask if you need image protection.  Here’s one way to find out. 

  1. Go to Google.com 
  2. Click on Images in the upper right corner.  This should take you to the Google Images search box. 
  3. Click on the Camera which says Search by Image when your mouse is over it.
  4. Click on Upload an Image and choose an image from your computer

Google will search the internet and display any visually similar images.

The focus of Flikr is on photography, but I see no reason this would not work for images of fine art as well.  You can read more about Pixy at https://www.pixsy.com

Arteza Markers

2020-01-25-Arteza2020-01-25-Tombow-4-webI recently received a gift of some Arteza Brush Pen Markers.  These are described as Blendable Water-Based Ink.  You may have seen ads for this product all over social media.  Normally I am suspicious of such ads, but after meeting a fellow artist who had ordered some, I put these on my wishlist as well.

Well!  I can report that I am very impressed with this product.  I made a color chart of the 48 pen set, and it is so much more vibrant than my Tombow Dual Brush pens.  The difference is stunning.

What happens down the road remains to be seen.  My experience with markers is that they tend to dry up, especially if you do not use them often.  And I have a bad habit of doing chores instead of artwork.  But I cannot deny the initial quality of the Arteza Brush Pens.

Materials – Watercolor Pencil and Mixed Media paper

I should mention the medium for the previous post since it was an eye-opening experience in itself. I used the Marine Assortment set of Caran D’arch Museum watercolor pencils on Strathmore Mixed Media paper.

I don’t know why I haven’t thought to use pencil on the smoother Mixed Media paper before. This time I found that darker values could be achieved by applying the pencil to dry paper and wetting it afterward. Lighter wash-like effects resulted from wetting before applying the pencil. I was very pleased with how easily the pencils moved across the surface.

I’ve purchased an embarrassing number of sets of different brands of both watercolor and regular colored pencils. They sit largely unused in their dedicated drawer in my art materials metal filing cabinet. They each have their own degree of hardness and flow. I just never liked the grainy residue they leave on #140 lb cold press paper. Why didn’t I try a smoother surface before?

It’s not like I haven’t previously tried pencil on smooth surfaces. The botanical art class I attended at Filoli estate in Woodside, California featured Prismacolor pencils on bristol vellum. The results were fantastic, almost photographic. But you had to be willing to put on so much pencil that techniques needed to be learned to reduce the waxy residue. Perhaps I was put off by that. More likely it was the bad memory of how the instructor seemed to choose favorites by lavishly praising the work of some but not others, including me.

In any case, I will definitely be taking my w/c pencils and some smooth paper on my next vacation.

Local Resources for a Father’s Day Project

434986CD-8BDA-4102-9298-6F0649D03475

Fifth Element at Cap Sante

In between completing the Atmospherics Landscapes class, I decided to hand-paint a Father’s Day card.  There’s a fairly good little art store within walking distance of the marina, Good Stuff Arts.  We are even given a coupon for 10% off this local business when we check into Cap Sante marina.  They do carry my favorite Pro Art tape, but they only had the note-sized frame cards.

I checked Bayshore Office Supply across the main drag, Commercial Ave,  and they had the Strathmore photo-mount cards.  I was looking for the frame cards that have a 3.5×5 opening, but this would have to do.   

Read my next post to learn how I created this card.

An Apple iCloud Notes Solution

I have embraced Apple notes as my go to app for capturing ideas when I’m on the road, but I ran into a problem this week. I thought I would write this up because it was a problem that even Apple Support did not understand. (I have not included an exact step-by-step of the Apple device settings, so if you want to know more information, don’t hesitate to ask in the comments.)

I’m not a big fan of the cloud because I’m often out of WIFI reach. The remote coves we enjoy on our boat have no internet service, and the advertised WIFI at marinas is usually woefully lacking. (I’m writing this in the Anacortes Starbucks.). However, I have found putting certain items in the cloud useful.

One of these is my ongoing Notes. I have several folders of notes for my art endeavors that I like to share between my desktop iMac, iPhone and iPad. These include Admired Artists, Art Materials, and Art Techniques. I recently wanted to add a scan from a magazine to one of my existing Art Techniques notes on Color Mixing.

It’s easy enough to take a scan or photo with the iPhone. You can save the scan to Photos, but you can also directly Share the scan or photo to Notes. The problem was that I could not select my iCloud based Color Mixing note after I chose Share.

I knew my iCloud notes were there because I could see them if I looked for them in the Notes app. So why couldn’t I Share to them?

I discovered there is now an app for Apple Support and downloaded it (so my WIFI was obviously strong enough), but could find no reference to sharing to iCloud Notes in the Knowledge Base. The app suggested the best way to get support was to telephone, and as usual, I am amazed at the quick response one gets when calling Apple. They do ask for your Apple ID, and I’ve paid for the extended Apple warranty for my mobile devices, so I guess I’ve paid for it, but it still amazes me how quickly you can reach a real person at Apple.

Unfortunately, it was difficult to describe my problem over the phone. Taisha did her best and rounded up all the mobile Notes support articles for me to read later, but none of them referred to this problem. She had some odd idea that you needed to do iCloud backups of your device to get to your notes. I happen to only trust iTunes for backup and didn’t think that was the problem. I’m sure I’d been able to save from my iPad to a note originally created on my iMac, so what was wrong now?

I guess it’s my engineering background, but I couldn’t rest until I solved this problem. Artists would do well to adapt the engineering approach. All it requires is asking yourself a question and testing to find the answer. So, my first question was, could I do this on my iPad? Yes, it turned out! I could select a photo from Photos and then Share that photo to a Note from the iCloud Notes folder. This was a clue! Could there be a setting on my iPad that i did not have enabled on my iPhone?

There were two places in the Settings to look- one in the iCloud section and one in the Notes Settings area. The iCloud settings are oddly located at the top of Settings under your name. Here I noticed all the iCloud settings were the same except iPhone iCloud Drive was off. Could that be it? I enabled iCloud Drive on the iPhone, but nothing changed.

Then I looked at Settings/Notes. Here I noticed that the very top option, Default Account was On My Phone. For my iPad, it said simply iCloud. I switched the option to iCloud on my iPhone as well. I wasn’t hopeful this would do anything because the description was “Choose a default account for Siri and the Notes widget in Today View.”

However, this did seem to be the solution! Now, when I went to Share to the Notes app, I could only see my iCloud notes. So I guess you only get one or the other.

It’s tempting once you fix something to leave it be or it might “break” again. However, the final engineering verification was to switch it back to Settings/Notes/Default Account=on my iPhone. Sure enough, I could now only share to notes on my iPhone. Switching it to Default Account=iCloud allowed me to share to my iCloud notes. So, Solution Found!

Art materials snipped

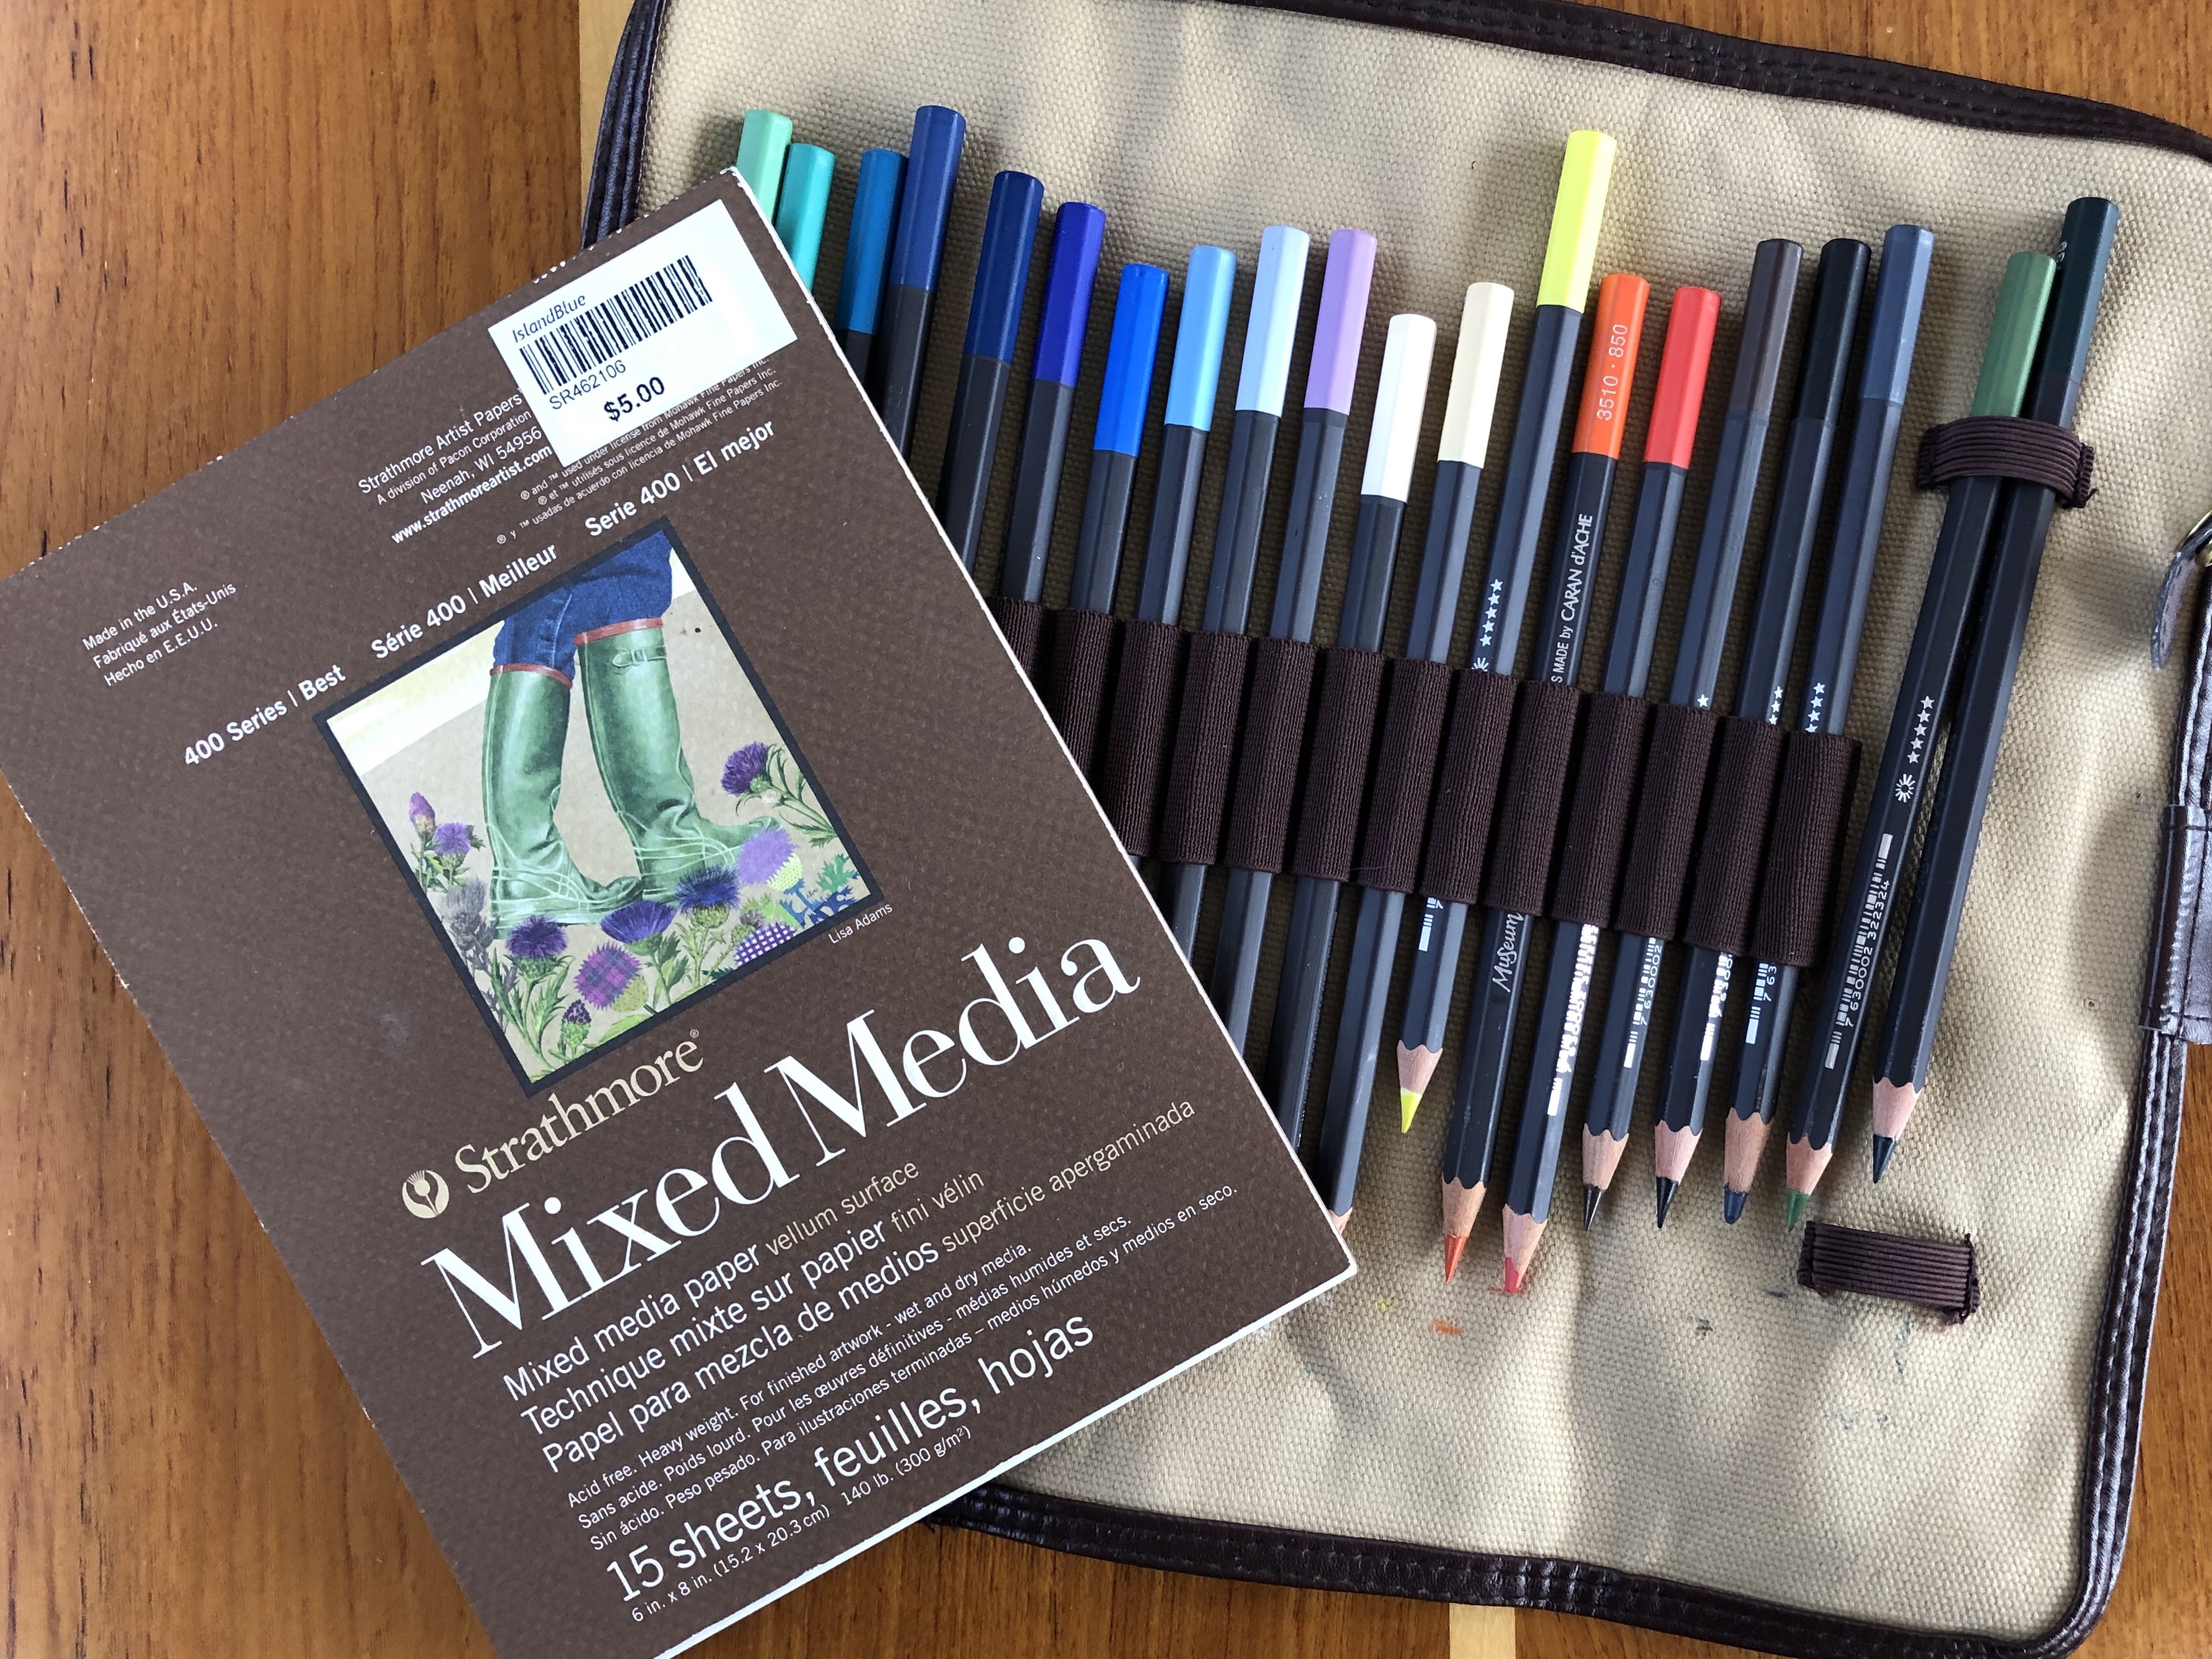
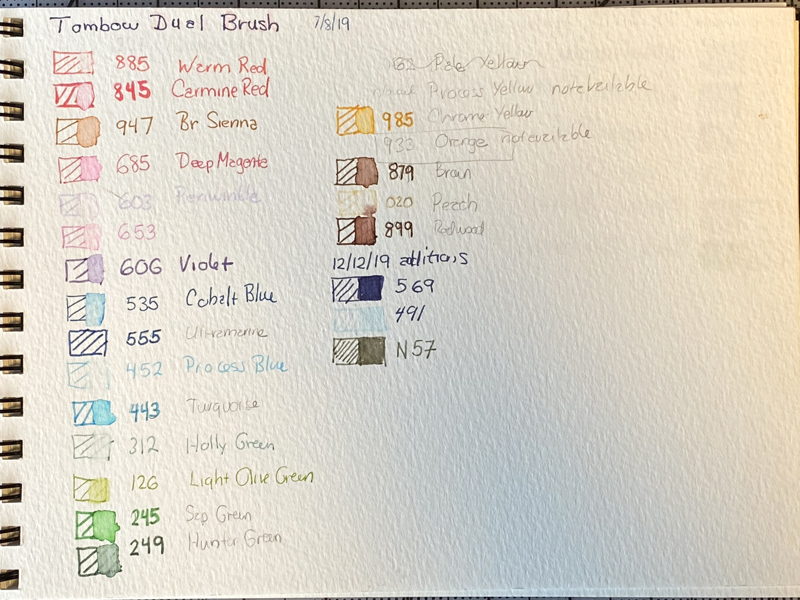
A tidbit of captured info, this time for my Art Materials folder
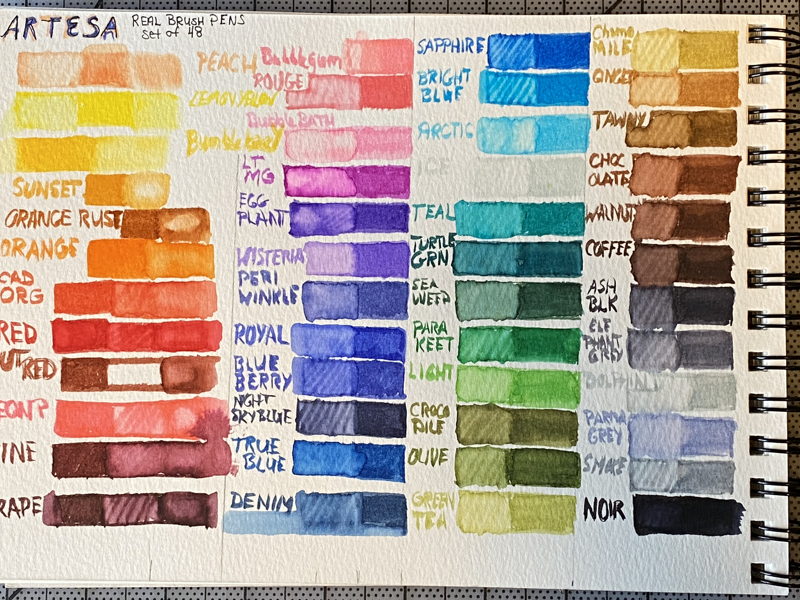
Camel Hair Brushes

I recently was given some very old brushes.  I thought it would be no problem looking up the manufacturer’s series number since they were still clearly visible on the handles.  However, I quickly found that a Google search yielded very little information

My husband pointed out that these brushes were probably made and discontinued before the internet even existed.  This is the case for the Murillo company where I found business records from New York indicating closure in 1982. 

I was especially curious about a brush marked 1” M. Grumbacher N.Y. Meissonier ® U.S.A.  After some research I determined that this is a “Camel Hair Mop”.  But even more interesting, even though you can find many “Camel Hair” brushes for sale today, very few vendors indicate the real hair used for this brush.  

Finally, I found a good description for all brush hairs at www.dickblick.com/info/brushhair/

It turns out, Camel Hair is certainly not from a camel.  As they describe:

Camel Hair does not come from camels at all. It is found in watercolor and lettering brushes and usually is made of squirrel, goat, ox, pony or a blend of several hairs, depending on the desired softness and intended cost of the brush.

Grumbacher appears to be owned by Chartpack now. (grumbacher.chartpak.com/categories/brushes/#)  The closes brush I could find on their website is the Academy Natural.  The info box says their natural hair is a combination of goat and pony hair.  It does look like it would carry a lot of water and color, so I will try it in my watercolor work.

Grumbacher Academy Natural